Behind the Scenes: Expert Ceiling Construction
A stunning ceiling isn't just about paint and light. It is about what goes inside. Take a look at the raw framework and POP work that makes our designs stand the test of time.
Here is a look at the initial stage of a living room ceiling project in Mumbai. You can see the clean lines of the gypsum board structure taking shape before the final POP finish and lighting are installed.
This video captures the detailed work involved in creating multi-layered ceiling designs. Notice the precision in cutting and fitting the gypsum boards to form the intricate curves and levels that will eventually hide wiring and hold lights.
My team at work, applying the first layers of POP plaster. This crucial step ensures a smooth, seamless surface, covering all joints and preparing the ceiling for its final design and paint.
This video shows the foundational grid work for a commercial Armstrong-style ceiling. This type of installation is perfect for offices and retail spaces, allowing for easy access to wiring and utilities.
A look at a complex POP design in progress. This image shows the raw, sculpted forms of a circular and rectangular ceiling feature before sanding and painting, highlighting the custom shaping I can achieve.
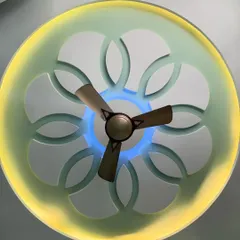
The central medallion is taking shape. This image shows an unfinished POP and gypsum ceiling with a traditional floral centerpiece, ready for the final finishing and wiring for a chandelier.
An interesting interlocking ring design being crafted from POP. This shows how even simple shapes can be combined to create a unique and modern focal point for any room.
Here you can see the intricate detail of a traditional jali pattern being created directly into the POP ceiling. This requires immense skill and patience to get the pattern just right before it sets.
A bold, sunburst-style gypsum ceiling under construction. The radiating lines are carefully placed to create a dramatic effect once the central lighting fixture is installed.
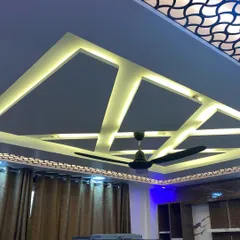
This is an unpainted view of a geometric ceiling design with recessed sections for cove lighting. The different levels create a sense of depth and architectural interest.
About Behind the Scenes: From Frame to Finish
Most people only look at the final paint finish, but the real magic happens in the framework. We use a 0.5mm G.I. grid for the perimeter and 0.9mm intermediate channels, ensuring your ceiling doesn't sag or crack. This structural work is what makes our designs look sharp for years, not just months.
When you choose a false ceiling, you aren't just buying a design. You are buying the structure that holds it up. Here is what we prioritize during every installation:
The Skeleton (Framework)
We never compromise on the G.I. grid. We space it at 2ft x 2ft intervals anchored with 8mm fasteners. This creates a rock-solid base that handles the weight of heavy chandeliers or complex POP shapes without any risk of bending.
The Skin (Boarding)
We use 12.5mm gypsum boards from trusted names like Gyproc or USG Boral. Why 12.5mm? Because it offers the best balance of density and workability. It is thick enough to hold sharp edges during carving and smooth enough to prevent ripples when the light hits it.
The Finish (POP Punning)
This is where the 'Arsh' touch comes in. Our team applies fiber mesh tape at every joint before the POP punning. This prevents the most common problem with ceilings—hairline cracks appearing after a few months. We finish with manual sanding to get that 'Level 5' smoothness that makes the surface look like a solid, seamless piece of art.
Whether it is a simple peripheral tray for your bedroom or an intricate S-curve design for your hall, we treat the backend work with the same attention as the visible art.
Similar work from other experts
Browse through Curated picks from other experts on mytribe
 7
7
Custom False Ceiling Designs for Modern Interiors
 6
6

Modern Gypsum False Ceiling Designs
 5
5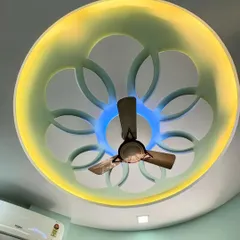
Custom Decorative Ceilings & LED Lighting Designs
Wall & Ceiling Artistry
Behind the Scenes of Our Interior Construction
Behind the Scenes: Our Craftsmanship in Action
More from False Ceiling Installation & Design by Arsh Interior Decorators
More services by Arsh Interior Decorators