How to Measure and Apply Your Custom Press-On Nails
Getting your custom nails to fit like a glove is easier than you think. Follow my step-by-step guides to get a salon-perfect look from the comfort of your home.
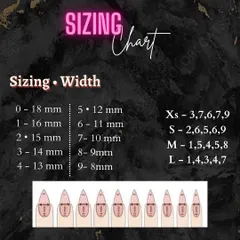
Here is a simple guide to getting your measurements for custom press-on nails. You can write down your measurements for each finger and select your desired nail shape from my visual guide.
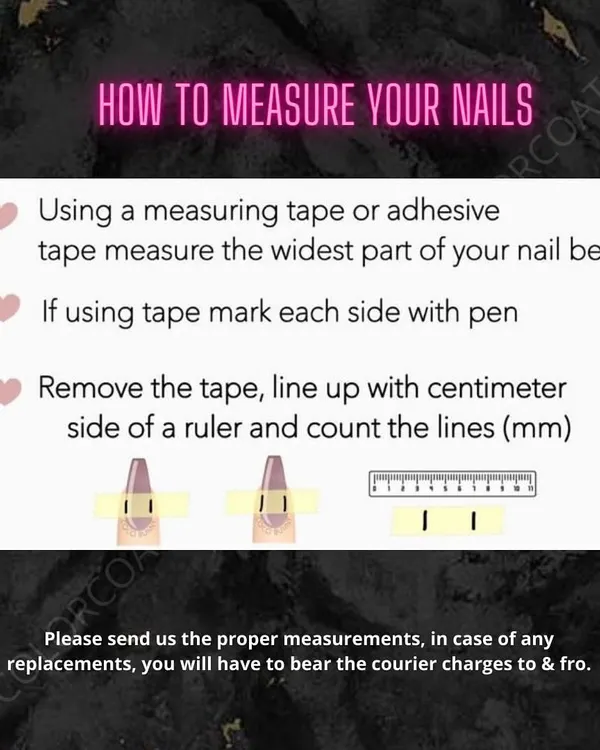
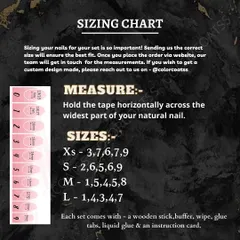
To get the most accurate measurement, make sure you place the measuring tape across the widest part of your nail. This ensures your press-ons will fit comfortably and look natural.
A step-by-step visual guide on how to measure your nails using tape. Just place the tape, mark the edges, and then measure the distance in millimeters with a ruler.
Another easy method for measuring your nails for press-ons. This guide shows how to use transparent tape to get a precise measurement for a perfect fit every time.
Don't have a measuring tape? No problem. You can also use a standard-sized coin for reference. Just take a photo of your hand next to the coin and I can estimate your sizes.
A quick tutorial on how to apply your press-on nails. The video shows you how to prep your natural nail by pushing back the cuticle and then applying the press-on for a secure fit.
About How It Works: Your Perfect Fit
The secret to press-ons that do not pop off is all in the preparation. Whether you are ordering a minimalist set or a heavy glam design, getting your measurements right is non-negotiable. If you follow the tape-and-ruler method properly, your press-ons will sit flush against your cuticle, making them look identical to a professional gel manicure. Spend five minutes on this step, and you will save yourself the frustration of a poor fit.
Why Precision Matters
I design every press-on set from scratch to match your unique nail beds. While standard sizing works for some, custom measuring ensures that your nails do not pinch at the sides or leave gaps near your skin. This is the difference between a drugstore kit and a handcrafted set.
How to Measure at Home
- The Tape Method: Place a piece of transparent tape across the widest part of your nail. Use a fine-tip pen to mark the sidewalls of your nail bed. Remove the tape, stick it on a flat surface, and use a ruler to measure the distance in millimeters.
- The Coin Reference: If you do not have a tape measure, place a coin next to your hand and take a clear, top-down photo. I can use this as a reference to estimate your sizes with high accuracy.
Application for Longevity
Every kit I send includes a buffer, a cuticle pusher, and your choice of adhesive.
- Prep: Always push back your cuticles and lightly buff the shine off your natural nail surface. This creates a rough texture that helps the glue bond better.
- Adhesive: For short-term wear (1-2 days), the jelly tabs work perfectly. For a long-lasting hold (up to 2 weeks), use the liquid glue. Apply a thin layer to both your natural nail and the back of the press-on for the best seal.
Remember, these sets are reusable. If you take care during the removal process, you can wear your favorite designs again and again.
Similar work from other experts
Browse through Curated picks from other experts on mytribe
 4
4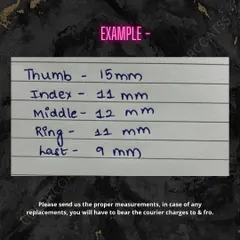
How to Measure Your Nails for a Custom Fit
How-To's & Nail Care Tips: Get the Perfect Press-On Fit
Custom Press-On Nails Tailored to Your Fit
Custom Press-On Nail Kits Delivered to You
Custom Press-On Nails That Actually Fit
 10
10
Custom Press-On Nail Sets Designed for You
More from Customized Press-On Nails by Nails by Maitri
More services by Nails by Maitri