Home Cinema Design and Construction Process
We transform ordinary rooms into private theaters. This gallery outlines our process, from early 3D planning and infrastructure layout to the final calibration of your audio and video gear.
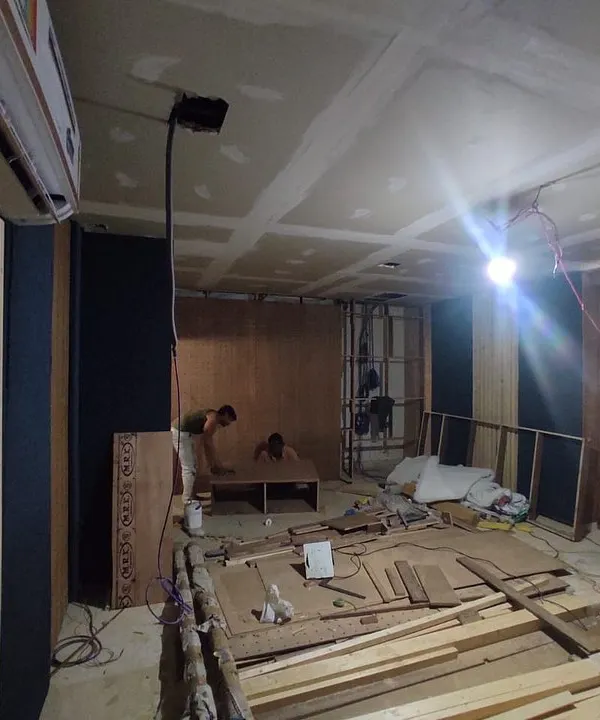
The beginning of a transformation. This is a "before" shot of a bare room in Nellore, ready to be converted into a luxury home cinema.
This is a 3D design rendering for a luxury home cinema in Chennai, showing the proposed layout with plush red recliners and a dark, modern aesthetic. This is the first step in bringing a vision to life.
Another rendering from the Chennai project, this view from the back shows the tiered seating, integrated step lighting, and the sleek, paneled walls.
A duplicate of 71, this rendering showcases the front of the room, with the large screen and clean, minimalist design.
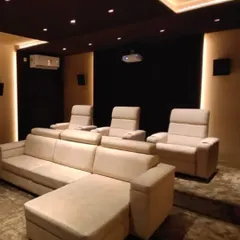
This rendering highlights the comfortable, fully-reclined chaise-style seating, demonstrating how I plan for ultimate comfort in my designs.
A duplicate of 74, this image again shows the detailed planning that goes into the seating layout and overall room design.
A close-up rendering of the luxurious red recliners, showing the texture of the fabric and the integrated cup holders.
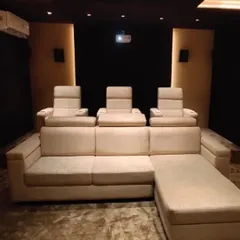
A duplicate of 72, this rendering provides another look at the overall architectural and interior design concept for the Chennai project.
A duplicate of 76, this close-up rendering helps the client visualize the final look and feel of the seating.
A 3D rendering of a luxury home cinema, showcasing a design with red recliners, an integrated bar area, and warm, ambient lighting.
About Behind the Scenes: From Concept to Completion
We start every build with a 3D rendering to confirm the layout before a single tool hits your walls. Whether we are retrofitting an existing room or building out a dedicated space in your house, we focus on acoustic treatment and cabling first to ensure your audio and video performance is not compromised by poor room acoustics.
Phase 1: 3D Design and Planning
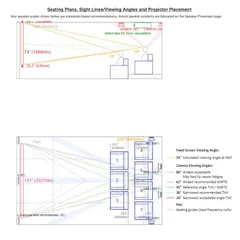
Every project begins with detailed 3D renderings. This allows us to visualize the final aesthetic and seating arrangement while mapping out the technical requirements. It helps you see how elements like the 120-inch screen and 7.1.2 audio setup fit your specific dimensions, ensuring no space is wasted.
Phase 2: Building the Acoustic Foundation
A luxury theater relies on sound control. We install multi-layered wall panels and high-density carpets to dampen reflections and manage echo. This is the difference between a loud room and a true cinema experience. We treat the walls to manage sound leakage, keeping your audio contained within the theater.
Phase 3: Infrastructure and Tech Installation
From installing 4K laser projectors to concealing fiber optic HDMI cabling, we handle all infrastructure. We use Dolby Atmos configurations to create an immersive sound field that fills your room evenly. By using professional-grade mounts and concealed conduits, we ensure the hardware looks integrated, not cluttered.
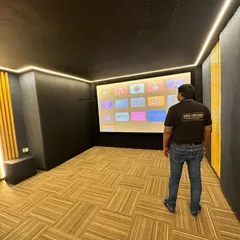
Phase 4: Calibration and Handover
Once the hardware is installed, we perform a professional calibration of the audio using receiver microphones. We adjust levels to match the room size and seating position. This is how we ensure that your cinema, whether in Madurai, Chennai, or Bangalore, delivers the same quality standard we promise every client. We remain on-site throughout the installation until everything performs exactly as it should.
Similar work from other experts
Browse through Curated picks from other experts on mytribe
 4
4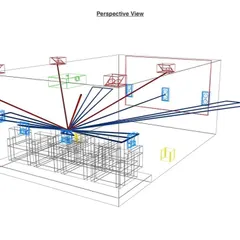
Home Theater Design and Installation Process
 12
12

Custom Home Cinemas & Media Rooms
Custom Home Cinema Installations
Design and Install Your Private Home Cinema
 5
5
Dedicated Home Theater Design and 3D Visualization
 4
4

Turnkey Home Theater Design and AV Integration
Looking for specific theater features?
Explore our categories to find the right cinema setup for your home.
More from Custom Home Theater Design & Installation by 3i Smart Home
More services by 3i Smart Home