Mastering Mehndi Fundamentals: Essential Design Drills
Mehndi art isn't magic, it is muscle memory. Before you attempt intricate bridal patterns, you must master the cone. These drills are the non-negotiable first step to professional artistry.
This is what practice looks like. In this video, I am demonstrating how to create various border and filler patterns. Consistent practice of these drills is the key to developing muscle memory and a steady hand.
Here, I am breaking down how to draw different types of flowers and leaves. We start with simple shapes and outlines, then learn shading techniques to add dimension and realism to our floral elements.
A look at a detailed practice sheet where I have broken down different design elements. Each element is numbered and named, like "bold flower element" or "dots fillings," which is how I structure my lessons.
Watch as I demonstrate how to create a decorative border using basic shapes like swirls, humps, and lines. Mastering these simple components allows you to build intricate and beautiful designs.
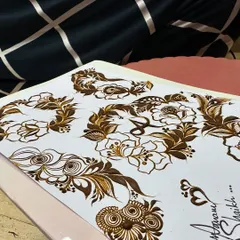
Practice makes perfect. This sheet shows drills for creating different types of leaves and vines, from simple strokes to complex, feathery patterns. These are essential filler elements in many designs.
A comparison of two different hand designs on a practice sheet. This is a great exercise for students to explore different styles and compositions.
A bold and beautiful floral motif created during a practice session. Notice the clean swirls and the contrast between the thick and thin lines.
This is what my workspace looks like during a class. You can see a completed practice hand, a sheet of filler drills, and a fresh henna cone, ready for the next lesson.
A practice grid for mastering different types of floral motifs. By drawing the same element multiple times, you build consistency and confidence in your work.
About From Basics to Brilliance: Drills & Practice
You cannot jump straight into bridal designs without mastering the humble line and the hump. My drill sessions focus on building the hand stability you need to pull a clean, consistent stroke every single time. It is not about innate talent, it is about the mehnat you put into these repetitive practice sheets.
Many people pick up a henna cone and try to create masterpieces on their first day. That is the quickest way to fail. In my classes, we strip everything back to the basics. You will start by learning how to hold the cone correctly and applying the right pressure for thick and thin lines.
We dedicate significant time to the elements that make up every great design:
- Foundation Elements: You will practice lines, humps, dots, and swirls until your hand moves without thinking. This is how you develop the muscle memory required for commercial speed.
- Floral Mastery: We move from simple doodles to structured shading. You will learn how to shade a single leaf to give it depth, which is the secret to making your henna pop once it stains.
- Filler Grids: Most students struggle to connect their patterns. I teach you how to construct grids and mesh patterns that fill space cleanly and quickly.
All these sessions are conducted live on Zoom. You are not just watching videos, you are practicing in real time. We work on paper until your strokes are steady, and only then do we move to the skin. If you have been struggling with shaky lines or designs that look messy, it is because your foundation is weak. Come ready to practice, be prepared to make mistakes on paper, and I will show you how to correct them.
Similar work from other experts
Browse through Curated picks from other experts on mytribe

Building Your Foundation in Mehndi Art
Master the Basics: Step-by-Step Mehndi Tutorials
Master Professional Mehendi Design from Scratch
Master Mehendi Art: Learn Bridal Henna in Delhi
 10
10
Mastering Basic Mehndi Designs
Learn Professional Henna Artistry in Mumbai
More from Henna Art Classes by Haya Fatimah
More services by Haya Fatimah